Thursday, April 30, 2015

Bird Blocks

I finished two more blocks, and have enjoyed working in this small format.  This time it seemed like birds had to be the subject.

Pretty simple.  Usually I add a lot more layers on these blocks, but the birds seemed to cry, daresay I 'tweet,' for simplicity.

So, here you have it.  I liked the fairly light colors bleeding into the wood grain.


On the backs, I always put the size, generally what kind of wood it is, and sign it.  I'll also add contact information, and in this case, one of my stickers with a self-portrait that I did.

Fun stuff.

Tuesday, April 28, 2015

New Commission. Tuba!

Well, if you looked at my last post, that clean, empty desk didn't last long.  Actually, I think it lasted for about two minutes.

On to the next project, a commission. I'm hired to paint a tuba!

Considerable work has gone into the painting already.  First I took about 30 pictures of his tuba.  Then I spent quite a bit of time narrowing down the pictures, cropping and choosing favorites.

We determined the size of the space where they want to hang it and came up with a canvas size.  The painting will be vertical to fit into the space nicely, so I had to go through the pictures and determine the best composition for a vertical canvas.  An entire tuba would be kind of boring and stereotypical, so I zoomed in on an interesting part and will do it at an angle, so the composition will draw you in.

Once we agreed on the composition, I did some sketching.  Here's a little watercolor sketch which gave them an idea of what I'm going to do.  They want Mexican colors, to include lime green or chartreuse, which is his favorite color, so it's going to be bright.  I can do bright!!!  The background will be cool colors of blues and violets, with the warm colors popping out on top.

This one's going to be fun.

Empty Desk

Well, this is a rare thing.  My desk is relatively empty.

Every now and then, say... every 40 years or so, I come to the end of a project, clean everything up and find... an empty desk!

So THAT'S what it looks like!

Thursday, April 23, 2015

Wood Block Finish, Part Two

 Okay, here's the scary part.  This is where I lay down my Golden super thick gel coat.  It's opaque when you lay it down, and turns glossy and transparent a few hours later as it's drying.

I took a picture of it after I laid it down and added the texture so you could see what it looks like at this stage.  For most of his face and hair, I simply drew in face and hair texture with my fingers.  Although I added the gel with a spatula, my hands just can't resist.  The spatula wouldn't give me what I wanted.

After the face and hair texture, I chose this goofy texture plate and laid it down at the bottom and on the sides (it's I think 1 1/2" deep.)


Now that it's dry you can see how much the texture adds.  Also, the gloss deepens the colors.  As any other medium, matt sometimes lightens colors, gloss will deepen and enrich them.  I have a hard time NOT choosing gloss, since I'm almost a Fauvist.

Done!  And, I like it!


New Cradled Wood Pieces


I'm working again on small cradled wood pieces.  For me it seems that three at a time is the perfect number, and I bring them along to completion together.

This works because there are so many steps involved.

First, choose the design and draw it.  I just lay it down with my Pitt pens, no pencil needed.  It's a rare case when I need a pencil for erasing; usually when the design is seriously complicated.

Second I painted in the background for the cardinal.  Fat little fellow!  I'm kind of liking the way the blue bled into the cardinal's breast and head; might leave it that way.  We'll see.

Then I took a white gouache to lightly cover all three birds so that when I do lay down their colors, they'll glow.  After that I painted my man with a Rowney blue, some watercolor yellow, and a sweet cranberry ink I lovingly protected all the way back from Fresh Paint in Minnesota.  My plans were to add many layers to all three of these, but I like the guy the way he is so I'm not going to add anything.  My next post will show you how I seal it.

Tuesday, April 14, 2015

The Continuing Saga of the Artist's Desk

Here we are, looking at my desk again!  Shunning the paperless society, I finally went back to having a paper calendar that I can touch.  This is the first time I've written anything on a calendar in a couple years or more, but it doesn't feel new at all, kinda feels good.

I've had my calendar on my phone for so long now, but because I'm such a visual person, it helps me to plan to actually see several months at a glance looming large and inky.  Settles things into my mind a little more solidly.

What else do we have here?  Well, Shepard Fairey tags... no, I am not a closet graffiti artist, just an admirer.  And no, I do not tag buildings, I REMOVE tags from buildings, to add them to my, uh, collection.  Yep.

Looks like a thank you note to one of my paintings purchasers, a postcard reminding me of an event at church.... a little drawing I did of Bob Marley... I guess everyone needs a little picture of Bob, huh?

There's a wad of folded papers - these are registrations for my classes next year that I rolled up and stuffed into my purse.  It's been a flood.  Every couple days I dig around, find where I stuffed them, and sort it all out.  Thank you, Lord, for new young friends to come!  Blessings, indeed.

Oh, I see my phone is out of its case again.  I NEVER take it out of its OtterBox.  Waaayyy too hard on phones.  Let's put it this way, I usually break my OtterBox cases.  The only reason I take it out of its case is because I spilled something on it. Definitely not paintwater this time, because I'm writing thank you notes.

This desk looks like I'm going more contemplation and planning than anything else.  The pile of papers under the tracing paper is an indicator that it's a planning night.  A good portion of that is charting our youngest son's path through his last two years of high school.  Wow.  That happened fast.

I see a pack of stencils sitting there that I got out, contemplated, and put away.  Go figure.  They probably represent the fact that I WANTED to make art, but had to do the other work, too.

I remember having a class doing some wood projects.  We were all outside sanding out wood, preparing it for paint and collage.  Getting tired and sore-handed, one of my students said, "This doesn't feel like art!"  I assured him that a great percentage of art did not feel like art, but like very hard work.  We went back to our sanding and got 'er done.

Monday, April 13, 2015

Tiny Desk Concert/Project

You've heard of Tiny Desk Concerts on NPR?  Well, this is my Tiny Desk Project.  I probably sang while I did it, so that counts.

I've been working on some smaller pieces lately.  Here I'm going to work up three nice cradled basswood boxes.  Lest people think I"m trying to swindle them when I sell these, each birch box costs me over $9.00.  But they're ever so lovely to hold, and just right.  And yes, by the way, I always write the support material and dimensions on the back.  Makes life easier all around.

I've decided to work on them all at the same time, bringing them through many layers together.  My first step is to think about what I want to do with each box.  Definitely want to use some of those London maps we got whilst driving that awesome five speed on the floor, driver's seat on the right, shifter on the left.

Collage material, a red Wells Fargo envelope.  I took one and told them what I was going to do with it, and they gave me about twenty.  Painted papers, magazine pages.

Next step, lay down the first layers of color.  I chose all cool colors and mixed 'em up.

After those first layers dried, I gave them a little depth and interest by laying down some textures and patterns in warm colors.  Texture plates, die-cut wood, a felt place mat, painted cardboard.  At this point, I treated each one very differently.  Music (from when I played Les Mis) and lovebirds, London maps and bright red paint, and layers of flowers.  Each of these pieces has about three layers I'm not going to mention because I don't want to go on too long.


Here are the finished three.  Once they were completely dry, I laid down a nice textured gloss coat.  Because I wanted the texture to show, I chose a really stiff Golden product.  Once I painted it on, I literally laid stencils over it to add even more pattern to the elements.  Toss in a little glitter and it's happy everywhere!

Yay!  Like 'em!

Thursday, April 9, 2015

Plaster Sculpture for Classes; Goofy Bird

Well, here we are again, doing crazy things.  I have never claimed to be a sculptor, for good reason.  But I just felt a driving need to have my kids try it out.  So, I purchased huge amounts of plaster tape, turned myself into a regular crane, and hefted the heavy stuff all over the place.

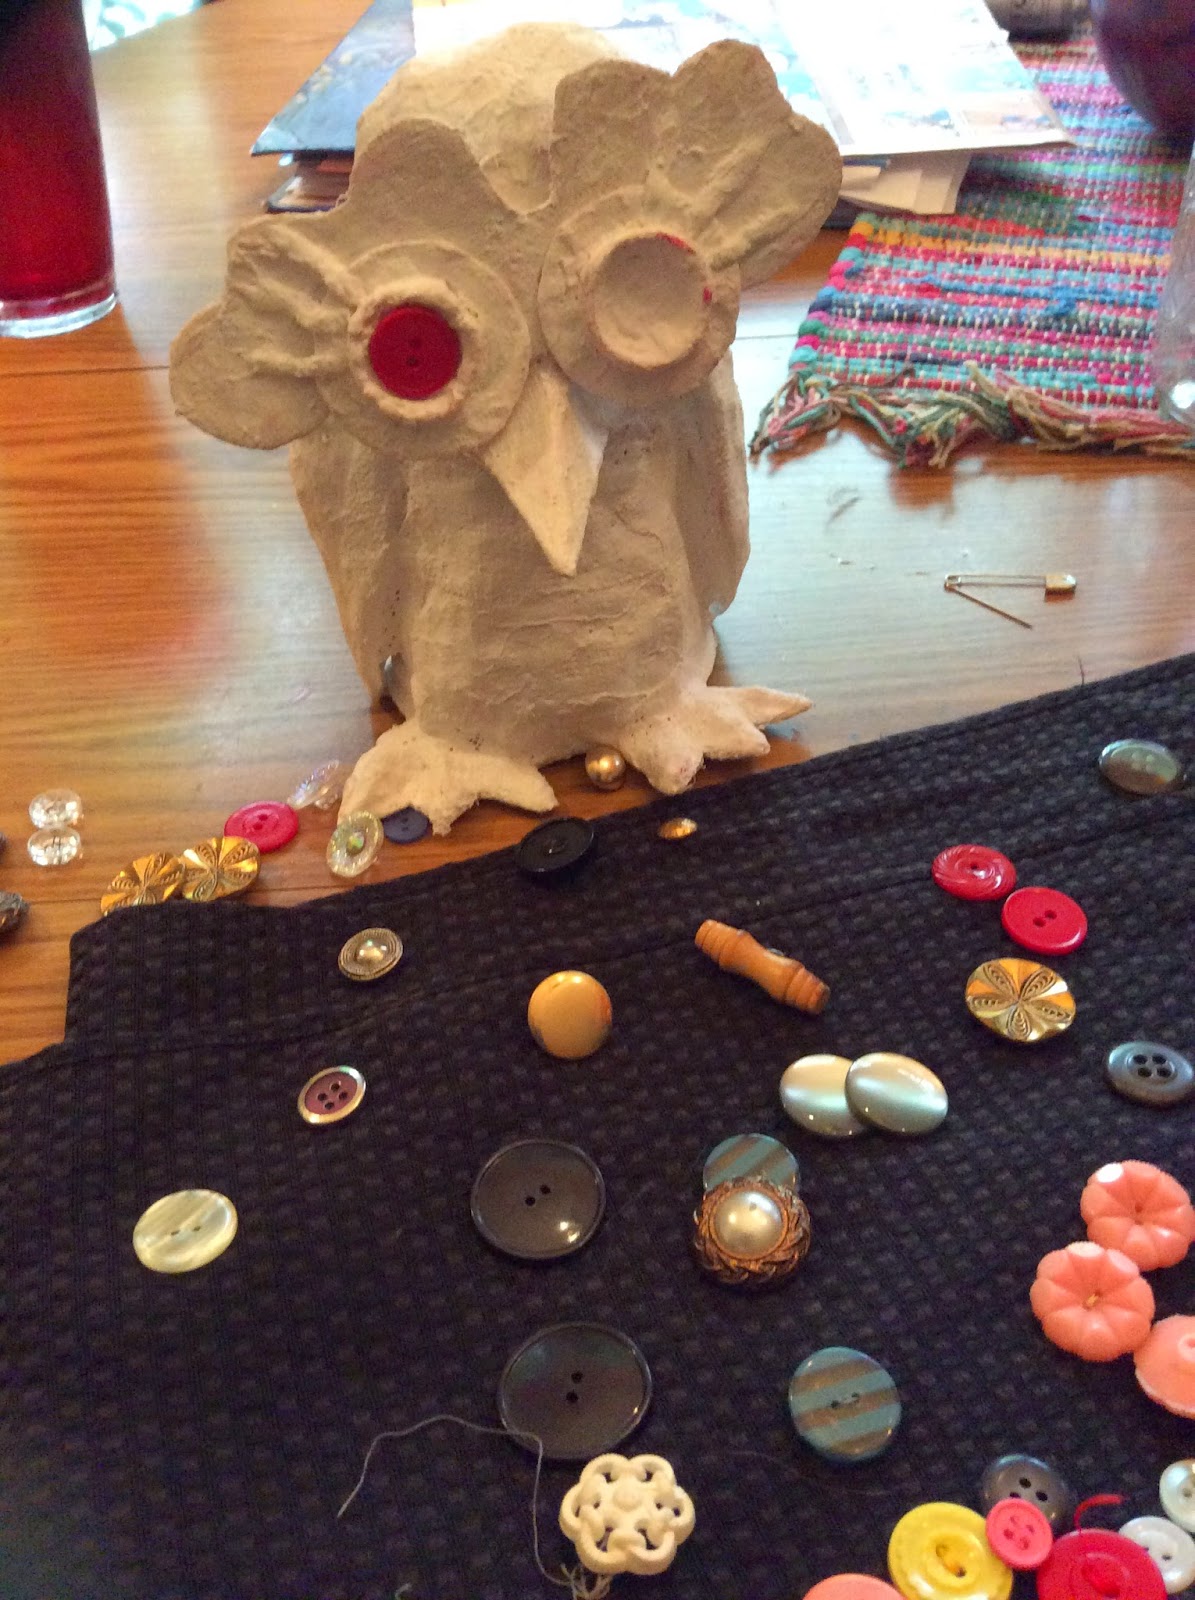
 Just remember, I never claimed to be a sculptor.  But here is my magnum opus in all its plastered glory.  He had humble beginnings - a plastic drinking cup and a yogurt bowl upon which I built aluminum foil, tape and cardboard.

I think the most fun was that I taught my students to dumpster dive.  Yep.  People pay me to teach their kids how to dumpster dive.  Kind of makes ya smile, doesn't it? :)  And oh, we found great things!

Once we had our armatures done, the plaster tape came out and our world turned white.  Kids young and old got really engrossed in their work and began to drool.  I know it's good when we get to that point.

So, here's my goofy bird awaiting his eyes.  My mother, daughter and I poured over the button jar together finding the perfect pair.

Do any of you remember digging through the buttons when you were kids?  I remember my mother saving buttons from old garments and tossing them in the jar.  As a child, I would dump them all out and arrange them in any number of ways, patterns, colors, etc. for hours at a time.  Okay, I was easily entertained.  But I was thoughtful and artistic even then.

So, here's my final furry fellow.  Quite handsome, I think.  Kind of makes you laugh, which is exactly my point.


Bio and Hint at Summer Art Classes

You know, once again I'm working on the ol' bio.  Do we ever stop tweeking them?  It occurred to me I might as well put it here, too, so you know who you're dealing with.

I am holding private classes this summer at our house, I'm blatantly stealing from NPR and calling them 'Driveway Moments.'  I'll also be teaching at The Woodlands Art League Gallery, http://www.woodlandsartleague.org/

Sooo.... here's the lowdown on me.

CINDY JOHNSON is an award winning artist who has produced artwork for many organizations, illustrated books and designed sets for theater.  Her most recently illustrated book, Ribbons of Rainbows, is connected with Reflective Life Ministries (www.reflectivelifeministries.org).  As a professional artist, she takes commissions and sells paintings, teaches ongoing classes, and at art conventions, galleries and events.  One of her passions is sharing her love of art with kids of any age, and she especially enjoys teaching art classes and giving private lessons.  Cindy’s artistic interest ranges widely and she is comfortable in many mediums.  Students in her classes will learn pencil, technical pen, charcoal, pastels, metal embossing, watercolors, crayon, watercolor pencils, collage, different printing methods and oil sticks among many other things.  Intensely curious and with a keen interest in art history, she will draw students into conversations about art through the ages, from Early Christian works right up to modern times, including current art events.  They will quickly become comfortable and confident judges of art, learning how to make their own decisions and not be swayed by what they are exposed to in every area of the art world.  Cindy is widely traveled and has learned in the great museums of the world.  These experiences are shared with students, making art come alive.  Her desire is that people will find beauty and hope in her paintings and in her life.  To find more on her life and work, go to her blog, www.colorcatstudios.blogspot.com.  To contact her for sales, commissions or classes, email her at www.colorcatstudios@gmail.com.  

Wednesday, April 1, 2015

Artistic Manicures Done Here!

Just don't understand why ladies spend so much on their nails.  Come on over!  I'll give you a free manicure!  You can specify acrylic or latex and choose your color.  Free!